Still hardcoding secrets in your Kubernetes deployments? Time to level up your security game! Here we explore a modern approach to secret management that will have your DevOps team cheering and your security team sleeping better at night.
What is Kubernetes and Why Does it Matter?
Kubernetes is an open-source container orchestration platform that automates the deployment, scaling, and operations of application containers. It has been positioning as the standard of cloud-native application since long and have few perfect reasons for it.
- Efficient resource utilization
- Automated scaling and load balancing
- Self-healing capabilities
- Declarative configuration management
Taking the information around API keys, database credentials are a very important task because that gives you lot of power so be responsible with it. This is where our paths began.
The Secret Struggle: Why Traditional Methods Fall Short
If I can be honest (and you should all know that by now), managing secrets in Kubernetes is a bit of a challenge. Yes, we have all had the pleasure of dealing with hardcoded credentials or a secret base64 encoded that are about as secure as a paper lock. Now, what if I told you that there is a better way?
Enter the Dynamic Duo: AWS, Manage Secrets and External Secrets Operator
It sounds like a DevOps fantasy, doesn’t it? Well, it’s time to realize that this is now a reality!
Imagine a world where your secrets are…
- Stored away safely outside of your cluster
- Injected into your pods at runtime. – No fuss, no manual adjustments to make it rotated.
It sure sounds like a DevOps dream, huh? Well, I guess it is time to accept that this is here!
The Power Players: What You Need to Know
- AWS, Manage Secrets: It’s like a highly secure vault for your sensitive information, accessible through an API.
- External Secrets Operator: The secret agent smoothly integrates your secrets into Kubernetes.
The Magic Formula: How It All Comes Together
The real magic begins here. We will:
- Set up an EKS cluster (because who doesn’t enjoy a solid Kubernetes cluster?)
- Install our secret agent (External Secrets Operator)
- Configure the vault (AWS, Manage Secrets)
- Create a highly secure service account
- Inject secrets like a pro.
Let’s Get Our Hands Dirty: The Step-by-Step Guide
Prerequisites
Let’s get into the wonderful world of secure secret injection, but first ensure that you have the followings at hand.
-
AWS Account: You should have an AWS account to build EKS clusters, and permissions to use AWS, Manage Secrets.
- Note: You will incur costs for running an EKS cluster and using AWS, Manage Secrets. Take a look at the AWS pricing pages for EKS and Secrets Manager to see what costs you might incur.
-
Install the current version of AWS CLI for your OS.
-
kubectl — You should have kubectl command line tool installed and configured on your system.
-
eksctl — Command line Utility to Create & Manage EKS Clusters With Comprehensive Support For Amazon EKS and cluster lifecycle (creation/upgrade/deletion). It adds abstraction over cluster creation and management.
-
Helm: Helm, a package manager for Kubernetes, which we will use to install the External Secrets Operator.
-
Basic Kubernetes Knowledge: Understand basic terminology and commands staff have to run on a regular basis.
-
IAM Permissions: Make sure your starting with an AWS user that has the ability to create and manage EKS clusters, IAM roles, and Secrets Manager.
Now that you have a good understanding of what is needed to secure your secrets, go and revolutionize how you manage Kubernetes secrets!
Step 1: Spin Up Your EKS Cluster
First, let’s create an Amazon EKS cluster:
eksctl create cluster \
--name demo-cluster \
--version 1.30 \
--region us-east-1 \
--zones us-east-1b,us-east-1d \
--nodegroup-name demo-cluster-ng \
--node-type t3.medium \
--nodes 2
After creation, configure kubectl:
aws eks update-kubeconfig --name demo-cluster --region us-east-1
Verify the connection:
kubectl get nodes
Step 2: Deploy Your Secret Agent (External Secrets Operator)
Add the Helm repository and update:
helm repo add external-secrets https://charts.external-secrets.io
helm repo update
Install External Secrets Operator — This command installs the external-secrets Helm chart into namespace, which creates namespace if needed and includes the custom resource definitions required for the chart to work.
helm install external-secrets \
   external-secrets/external-secrets \
    -n external-secrets \
    --create-namespace \
    --set installCRDs=true
Verify the installation:
kubectl get pods -n external-secrets
Step 3: Create the Ultimate Access Pass (IAM Policy)
Create a file named secrets-manager-policy.json with the following content:
{
  "Version": "2012-10-17",
  "Statement": [
    {
      "Effect": "Allow",
      "Resource": "*",
      "Action": [
        "secretsmanager:GetRandomPassword",
        "secretsmanager:GetResourcePolicy",
        "secretsmanager:GetSecretValue",
        "secretsmanager:DescribeSecret",
        "secretsmanager:ListSecretVersionIds",
        "secretsmanager:ListSecrets",
        "secretsmanager:BatchGetSecretValue"
      ]
    }
  ]
}
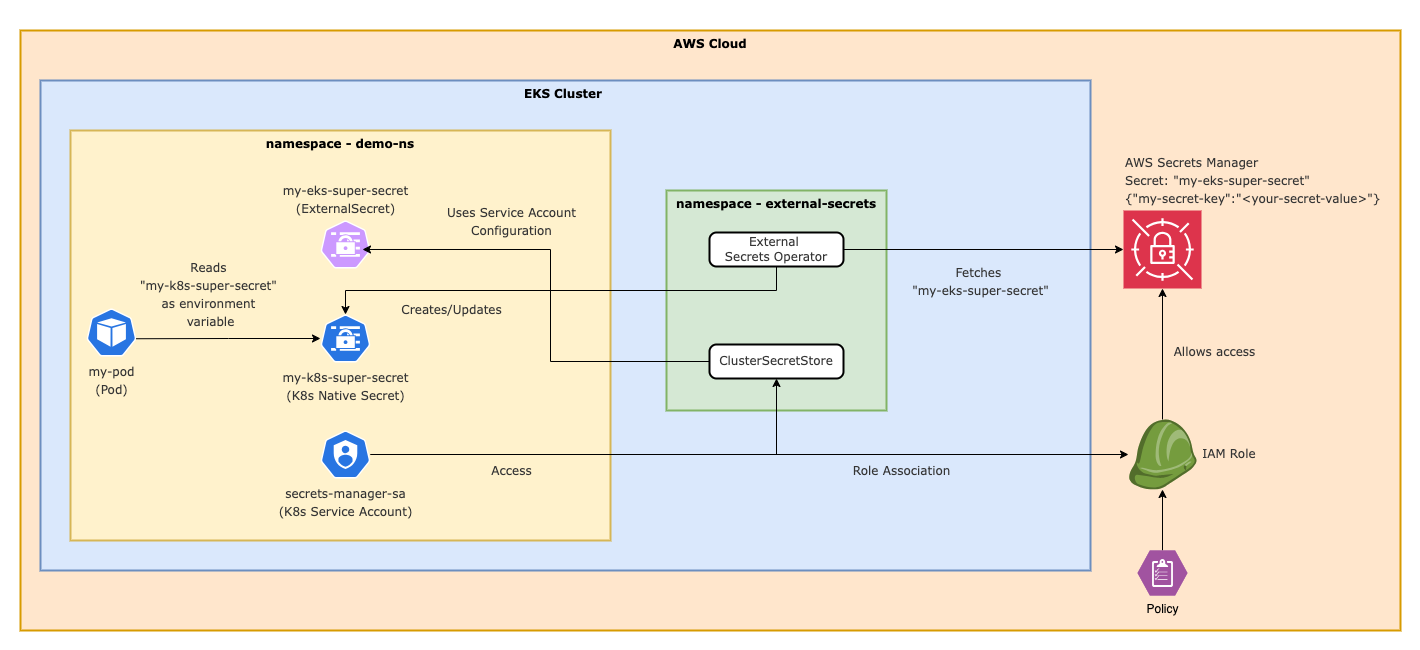
The secrets-manager-policy.json determines an AWS IAM policy responsible for providing the required permissions pertaining to AWS, Manage Secrets; Among other things, the policy permits secret retrieval or listing secrets or describing their details. You can see that the Resource field is set to *, meaning it applies to all secrets in the account. The page’s security note calls for restriction of this to exact ARNS in order to enhance security following the principle of least privilege — you should ensure that access is limited only to the necessary resources.
Create the IAM policy:
aws iam create-policy --policy-name SecretsManagerReadPolicy --policy-document file://secrets-manager-policy.json
Step 4: The VIP Service Account
Create a namespace for our demo:
kubectl create namespace demo-ns
Associate an IAM OIDC provider with your EKS cluster:
eksctl utils associate-iam-oidc-provider --region=us-east-1 --cluster=demo-cluster --approve
Create the service account and associate it with the IAM role: It Creates a kubernetes service account which is attached to AWS IAM, providing permission s for Secrets Manager ReadOnly.
eksctl create iamserviceaccount \
    --name secrets-manager-sa \
    --namespace demo-ns \
    --cluster demo-cluster \
    --region us-east-1 \
    --attach-policy-arn arn:aws:iam::<ACCOUNT_ID>:policy/SecretsManagerReadPolicy \
    --approve \
    --override-existing-serviceaccounts
Replace <ACCOUNT_ID> with your AWS account ID.
Verify the service account creation:
kubectl get serviceaccount -n demo-ns
Step 5: Stash Your Secret in AWS, Manage Secrets
This command is saving a secret name my-eks-super-secret with key-value pair as your secret and by default, it creates the region us-west-2 region.
aws secretsmanager create-secret --name my-eks-super-secret --region us-east-1 --secret-string '{"my-secret-key":"<your-secret-value>"}'
Replace <your-secret-value> with your actual secret.
Step 6: Configure Your Secret Agent (External Secrets Operator)
The YAML configuration defines a defines a ClusterSecretStore resource to manage secrets from AWS, Manage Secrets in Kubernetes. Essentially, this will use AWS, Manage Secrets in the us-east-1 region as the secret provider. It uses the Kubernetes service account called secrets-manager-sa in the demo-ns namespace to authenticate (JWT), Kubernetes can therefore securely retrieve secrets from AWS, Manage Secrets by utilizing IAM permissions related to the relevant Kubernetes service account. Essentially, it tells Kubernetes how to access and manage the secrets stored in AWS, Manage Secrets for the cluster.
Create a file named secret-store.yaml:
apiVersion: external-secrets.io/v1beta1
kind: ClusterSecretStore
metadata:
  name: aws-secretsmanager
spec:
  provider:
    aws:
      service: SecretsManager
      region: us-east-1
      auth:
        jwt:
          serviceAccountRef:
            name: secrets-manager-sa
            namespace: demo-ns
Apply the SecretStore:
kubectl apply -f secret-store.yaml
Create a file named external-secret.yaml:
This YAML configuration defines an ExternalSecret in Kubernetes. It pulls a secret from AWS, Manage Secrets (referencing a ClusterSecretStore named aws-secretsmanager) every hour. The secret called my-eks-super-secret contains a key my-secret-key. The secret is then stored in Kubernetes as native secret my-k8s-super-secret under the demo-ns namespace, making the AWS secret available for Kubernetes workloads.
apiVersion: external-secrets.io/v1beta1
kind: ExternalSecret
metadata:
  name: my-eks-super-secret
  namespace: demo-ns
spec:
  refreshInterval: 1h
  secretStoreRef:
    name: aws-secretsmanager
    kind: ClusterSecretStore
  target:
    name: my-k8s-super-secret
  data:
  - secretKey: my-secret-key
    remoteRef:
      key: my-eks-super-secret
      property: my-secret-key
Apply the ExternalSecret:
kubectl apply -f external-secret.yaml
Verify the Kubernetes secret creation:
kubectl get externalsecrets.external-secrets.io -n demo-ns

Step 7: The Grand Finale - Use Your Secret in a Pod
Create a file named demo-pod.yaml:
This YAML configuration defines a Kubernetes Pod named my-pod in the demo-ns namespace. The pod has one container my-container which uses the busybox image. The container runs a shell command that prints a secret value (MY_SECRET) and then sleeps for one hour (3600 seconds).
The MY_SECRET environment variable gets its value from a Kubernetes secret named my-k8s-super-secret, specifically from a key called my-secret-key. This setup allows the container to securely access a secret from the Kubernetes secret store without hardcoding it in the pod definition.
apiVersion: v1
kind: Pod
metadata:
  name: my-pod
  namespace: demo-ns
spec:
  containers:
  - name: my-container
    image: busybox
    command: ["/bin/sh", "-c", "echo Secret value: $MY_SECRET && sleep 3600"]
    env:
    - name: MY_SECRET
      valueFrom:
        secretKeyRef:
          name: my-k8s-super-secret
          key: my-secret-key
Apply the pod:
kubectl apply -f demo-pod.yaml
Moment of Mic Drop: Verify Your Secret Injection!! 🎤
This command allows you to connect to the pod and print the value of the MY_SECRET environment variable.
kubectl exec -it my-pod -n demo-ns -- /bin/sh -c 'echo Secret value: $MY_SECRET'

Cleaning Up: Removing Resources
You should always clear your resources once you are done experimenting else AWS will keep charging you. We can remove everything we built by doing the following:
Delete the demo pod:
kubectl delete pod my-pod -n demo-ns
Delete the ExternalSecret and SecretStore:
kubectl delete externalsecret my-eks-super-secret -n demo-ns
kubectl delete clustersecretstore aws-secretsmanager
Delete the secret from AWS, Manage Secrets:
aws secretsmanager delete-secret --secret-id my-eks-super-secret --region us-east-1 --force-delete-without-recovery
Delete the IAM service account:
eksctl delete iamserviceaccount --name secrets-manager-sa --region us-east-1 --namespace demo-ns --cluster demo-cluster
Delete the IAM policy:
aws iam delete-policy --policy-arn arn:aws:iam::<ACCOUNT_ID>:policy/SecretsManagerReadPolicy
Remember to replace <ACCOUNT_ID> with your actual AWS account ID.
Uninstall the External Secrets Operator:
helm uninstall external-secrets -n external-secrets
Delete the EKS cluster:
eksctl delete cluster --name demo-cluster --region us-east-1
Finally, Having the OIDC provider associated with your cluster doesn’t cause harm or consume resources, and it is only used when needed by your workloads or IAM roles. But you can remove the OIDC provider if needed:
aws eks describe-cluster --name demo-cluster --region us-east-1 --query "cluster.identity.oidc.issuer" --output text
aws iam delete-open-id-connect-provider --open-id-connect-provider-arn arn:aws:iam::<ACCOUNT_ID>:oidc-provider/oidc.eks.us-east-1.amazonaws.com/id/<OIDC_ID>
With the steps below you make sure that all resources we create during this tutorial will be deleted correctly and your AWS account remains clean without any unintended charges.
Best Practices to Manage Kubernetes Secrets
Even though our setup is a great way to secure secrets in Kubernetes, there are additional best practices that should be followed to keep a strong security posture:
-
Automated Secret Management: Make secret to get updated in the interval of certain time. Some types of secrets are eligible for automatic rotation via AWS, Manage Secrets.
-
Audit and Monitor — Audit the access logs regularly and alert for abnormal control flow to certain secret keys.
-
Encrypt Secrets at Rest: AWS, Manage Secrets will encrypt your secrets at rest. By default this is enabled as well, but make sure you explicitly check the settings.
-
Implement RBAC — Create Role-Based Access Control (RBAC) items for your Kubernetes system to prevent unauthorized users and pods from accessing secrets.
-
Versioning: Version your secrets in AWS, Manage Secrets so that you can retrieve previous versions if need be.
-
Environment Separation — Use different secrets (and potentially even different AWS accounts) for development, staging and production environments.
-
Principle of Least Privilege: This ties into setting up IAM roles and Kubernetes service accounts.
-
Periodic Security Reviews: Perform period security reviews on your secret management best practices.
Applying these best practices along with the setup we discussed means that you will get closer to mastering secure secret management in Kubernetes!
Wrapping Up: When This Might Matter
With this setup you are not just secrets managing; you are securing your run-time Kubernetes. You’ve just bid adieu to hardcoded nightmares and welcomed dynamic, secure and scalable secret management.
If this guide helped you, share it, and let Kubernetes secrets management become an easy task for everyone!