In this tutorial, I will show you how to use Ansible to install an SSL certificate on a Windows server. Using Ansible to automate the SSL certificate installation process can improve efficiency, consistency, and collaboration in your IT operations. I will cover the following steps:
- Copying the SSL certificate file to the server
- Importing the PFX certificate to the specified store
- Get imported certificate
- Binding the certificate to the websites
- Restarting the websites
- Run Ansible playbook
Benefits of Installing SSL Certificates on Windows Servers with Ansible
Installing an SSL certificate on a Windows server using Ansible automation has several benefits in IT operations:
-
Efficiency: Automating the installation process with Ansible saves time and effort compared to manually installing the SSL certificate on each server. This is especially useful if you have multiple servers that need to be configured with SSL certificates.
-
Consistency: Using Ansible ensures that the SSL certificate is installed consistently on all servers. This helps to prevent configuration errors and ensures that all servers are properly secured.
-
Repeatability: If you need to install SSL certificates on new servers in the future, you can simply re-run the Ansible playbook to automate the process. This saves time and reduces the risk of errors.
-
Version control: Using Ansible allows you to version control the SSL installation process. This means that you can track changes to the playbook over time, and revert to previous versions if necessary.
-
Collaboration: Collaborating on an Ansible playbook with your team makes it easier to share knowledge and responsibilities, and ensures that everyone is following the same process.
Prerequisites
Before you begin, make sure you have the following prerequisites:
- Ansible installed on your local machine
- An SSL certificate file (in .pfx format) and password
- Access to the target Windows server
Sample Code
I have set up a Git repository to share the sample code for this tutorial. You can find the playbook and other necessary files in the repository.
Now let’s get started!
Step 1: Copying the SSL Certificate File to the Server
First, I will use the win_copy module to copy the SSL certificate file to the target server. This is necessary because the certificate file needs to be accessible on the server in order to be imported. Here’s the playbook task that performs this step:

This task uses the win_copy module to copy the certificate file from the source path to the target path. The src and dest options specify the source and destination paths, respectively. Make sure to replace certificate_source_path, certificate_name, certificate_file_extension, and certificate_target_path with the actual values for your certificate.
Step 2: Importing the PFX Certificate
Next, I will use the win_pfx_certificate module to import the PFX certificate to the specified store. Here’s the playbook task that performs this step:
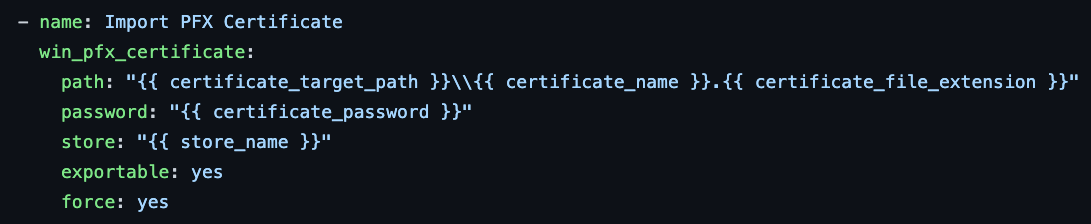
This task uses the win_pfx_certificate module to import the certificate located at the specified path. The password option specifies the password for the certificate, and the store option specifies the store where the certificate should be imported. The exportable option is set to yes to allow the private key to be exportable, and the force option is set to yes to overwrite the certificate if it already exists in the store.
Step 3: Get imported certificate
I will use the win_certificate module to retrieve the imported certificate from the specified certificate store on the target Windows server. The name and store options specify the name and store of the certificate to be retrieved.
The register option stores the result of this task in a variable called imported_certificate, which can then be used in subsequent tasks.
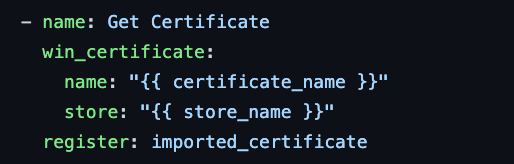
This task is useful as I need to use the certificate in other tasks, such as binding it to an IIS website.
Step 4: Binding the Certificate to the Websites
Now that the certificate has been imported, we can bind it to the websites. To do this, I will use the win_iis_website_binding module. Here’s the playbook task that performs this step:
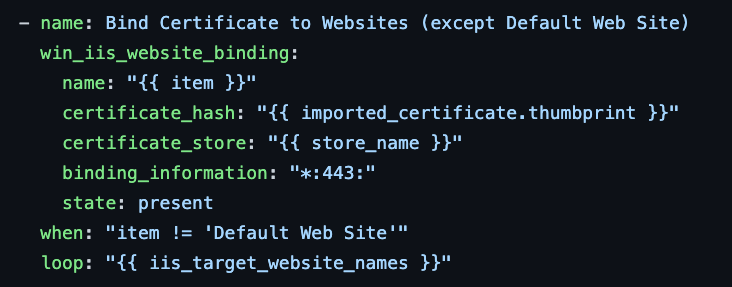
This task uses the win_iis_website_binding module to bind the certificate to each website in the iis_target_website_names list. The certificate_hash and certificate_store options specify the certificate to be used, and the binding_information option specifies the binding information for the website, in this case using HTTPS on port 443. The when condition ensures that the certificate is not bound to the Default Web Site. The loop option specifies that the task should be applied to each website in the iis_target_website_names list.
Step 5: Restarting the websites
Finally, I will use the win_iis_website module to restart the websites. This step is necessary because the binding changes made in the previous step won’t take effect until the website is restarted. Restarting the website ensures that the new SSL certificate is being used. Here’s the playbook task that performs this step:
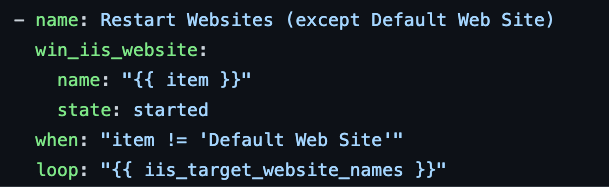
This task restarts the websites that are specified in the iis_target_website_names list, except for the Default Web Site. The win_iis_website module is used to manage the state of an IIS website. In this case, the state option is set to started, which means that the website will be started if it is stopped, or left as-is if it is already started. The when condition ensures that the Default Web Site is not affected by this task. This is useful if you don’t want to restart the Default Web Site for some reason. The loop option specifies that the task should be applied to each website in the iis_target_website_names list. This allows you to specify multiple websites to be restarted with a single task.
Step 6: Run Ansible playbook
The ansible-playbook command is used to run an Ansible playbook. A playbook is a script that defines a series of tasks that will be executed by Ansible on managed host(s).
The --extra-vars option is used to pass variables to the playbook at runtime. The argument to this option should be in the form of a YAML dictionary. The @ symbol indicates that the value is a path to a file on the filesystem containing the YAML dictionary. The path should be provided following the @ symbol. The -i option specifies the path to an Ansible inventory file. An inventory file is a text file that lists the hostnames or IP addresses of managed hosts, grouped by host group. The playbook.yml argument is the path to the playbook that you want to run.
ansible-playbook --extra-vars "@vars.yml" -i inventory.ini playbook.yml
I hope this helps! Let me know if you have any questions.