In SharePoint 2013 search results, display template is the one going to define what you will see in your search results page and how it will look like.
To create your own display templates follow the below steps:
- Go to Site Settings page and select Master pages and page layouts under Web Designer Galleries section
- Click on Display Templates and then Search
- Select Item_Default.html and create a copy by selecting Download a Copy from the item drop-down menu.
- Save the file to you desktop and rename to Item_TeamCenter.html.
- Upload this file in the same location where you downloaded the file and fill out the following columns and click save:
- Content Type - Item Display Template
- Title - Teamcenter Item
- Description - Type something
- Do not change anything else in this screen
_Important Note: _Basically SharePoint will create a JavaScript file equaling to the html display template file in same location behind the scene. So don’t try to create/copy the corresponding JavaScript file manually.
- Now open your site in SPD 2013 and go to All Files > _catalogs > masterpage > Display Templates > Search
- Select Item_ TeamCenter.html from the list and then select Edit file with advanced mode.
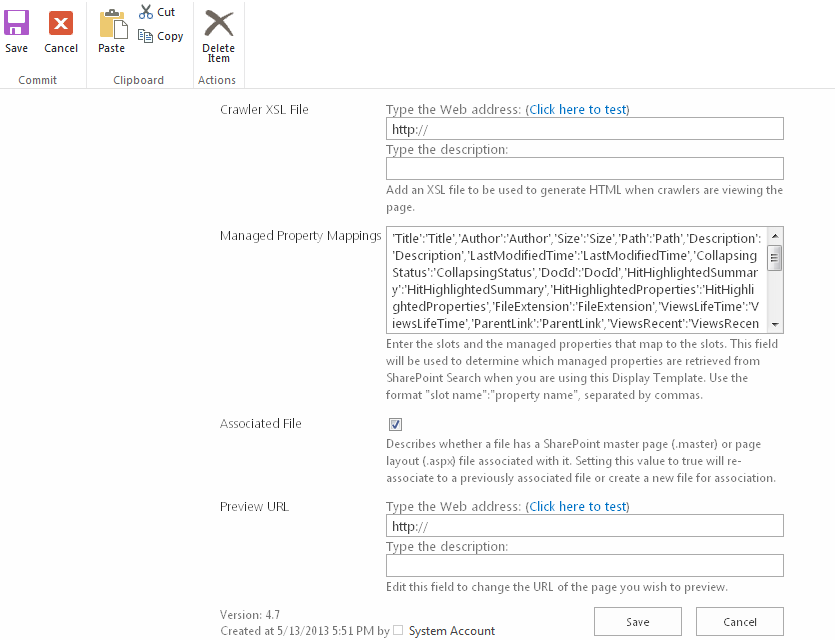
- Press CTRL + Find and look for the tag mso:ManagedPropertyMapping
- Add your managed property column name similar like other columns are added already as shown below (here I have added TeamCenterItemName property along with the existing properties):
<mso:ManagedPropertyMapping msdt:dt="string">'Title':'Title','Author':'Author','Size':'Size','Path':'Path','Description':'Description','LastModifiedTime':'LastModifiedTime','CollapsingStatus':'CollapsingStatus','DocId':'DocId','HitHighlightedSummary':'HitHighlightedSummary','HitHighlightedProperties':'HitHighlightedProperties','FileExtension':'FileExtension','ViewsLifeTime':'ViewsLifeTime','ParentLink':'ParentLink','ViewsRecent':'ViewsRecent','FileType':'FileType','IsContainer':'IsContainer','SecondaryFileExtension':'SecondaryFileExtension','DisplayAuthor':'DisplayAuthor','TeamCenterItemName':'TeamCenterItemName' </mso:ManagedPropertyMapping>
- Update the TeamCenterItemName propery in the body of your display template HTML page as below :
\_#= ctx.CurrentItem. TeamCenterItemName =#\_
- Save, check in, and publish the Item_TeamCenter.html file.
- Edit the search result WebPart and the select this template name.
- That’s it you are ready to see your display template in the search result.
- If you want to flip you display templates for a specific set of result items then you have write you Query Rules. That I will be explaining in my next article.
Troubleshooting: Why Display Template Changes Are Not Reflecting
A common follow-up problem: you create a display template HTML file, SharePoint generates the corresponding JavaScript file on upload, but the next day edits to the HTML file are not reflected — and re-uploading a new template HTML file does not even generate the corresponding JavaScript file.
This usually comes down to three things to check:
- The JavaScript file is not synced with the HTML display template file. SharePoint generates a
.jsfile from each HTML display template behind the scenes; if that sync breaks, your HTML edits will not take effect. - The managed property is not mapped in the properties of the display template file.
- SharePoint 2013 is not installed/configured properly.
After verifying these parameters and fixing the property mapping/sync, the display template started working as expected.